Creative Ways for Teachers to use Google Slides

Google Slides, a powerful and versatile presentation tool, has revolutionized the way teachers engage and educate their students. With its user-friendly interface and collaborative features, Google Slides offers countless opportunities for creativity and interactivity in the classroom. From creating dynamic presentations to facilitating collaborative projects and even assessing student understanding in real-time, Google Slides enables teachers to enhance their instructional methods and empower students in their learning journey. In this article, we will explore various creative ways in which teachers can leverage the features of Google Slides to deliver engaging lessons, foster collaboration, personalize instruction, and showcase student work. Get ready to unlock the full potential of Google Slides and transform your teaching experience.
Teachers can use Google Slides in various creative ways beyond presentations and agenda slides. Here are some ideas:
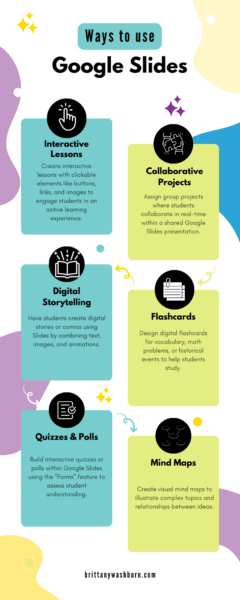
- Interactive Lessons: Create interactive lessons with clickable elements like buttons, links, and images to engage students in an active learning experience.
- Collaborative Projects: Assign group projects where students collaborate in real-time within a shared Google Slides presentation.
- Digital Storytelling: Have students create digital stories or comics using Slides by combining text, images, and animations.
- Flashcards: Design digital flashcards for vocabulary, math problems, or historical events to help students study.
- Quizzes and Polls: Build interactive quizzes or polls within Google Slides using the “Forms” feature to assess student understanding.
- Mind Maps: Create visual mind maps to illustrate complex topics and relationships between ideas.
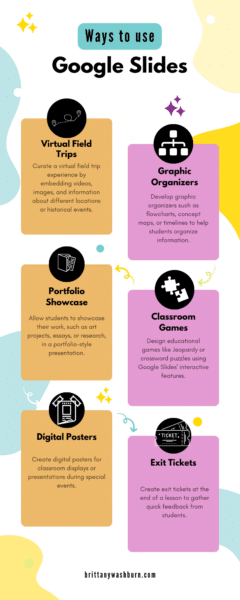
- Virtual Field Trips: Curate a virtual field trip experience by embedding videos, images, and information about different locations or historical events.
- Graphic Organizers: Develop graphic organizers such as flowcharts, concept maps, or timelines to help students organize information.
- Portfolio Showcase: Allow students to showcase their work, such as art projects, essays, or research, in a portfolio-style presentation.
- Classroom Games: Design educational games like Jeopardy or crossword puzzles using Google Slides’ interactive features.
- Visual Summaries: Encourage students to summarize their learning visually by creating summary slides for lessons.
- Literature Analysis: Analyze literature by creating character profiles, plot diagrams, or thematic analysis slides.
- Science Experiments: Document and analyze science experiments with text, images, and graphs.
- Digital Posters: Create digital posters for classroom displays or presentations during special events.
- Newsletter or Announcements: Use Slides to design class newsletters or announcements with dynamic visuals.
- Exit Tickets: Create exit tickets at the end of a lesson to gather quick feedback from students.
- Peer Editing: Facilitate peer editing by having students provide feedback on each other’s work within a shared presentation.
- Virtual Tours: Take students on virtual tours of historical sites, museums, or landmarks using images and descriptions.
- Daily Agendas: Besides regular agendas, use Slides to display daily learning objectives, tasks, and activities.
- Student Self-Assessment: Encourage students to assess their own understanding by creating self-assessment slides.
Google Slides offers a versatile platform for educators to enhance the learning experience by incorporating multimedia, interactivity, and collaboration.
Creative Ways for Teachers to Use Google Slides
1. Introduction to Google Slides and its Benefits for Teachers
Understanding Google Slides
So, you’ve heard about Google Slides, but what exactly is it? Well, think of it as the cool sibling of PowerPoint, with a lot more pizzazz and a fancy online twist. Google Slides is a free web-based presentation software offered by Google as part of its G Suite. It allows you to create, edit, and collaborate on presentations with ease.
Advantages of Using Google Slides in the Classroom
Now that we know what Google Slides is, let’s talk about why teachers should be as excited as a kid in a candy store about using it in the classroom. First of all, it’s a game-changer in terms of accessibility and convenience. You can access your presentations from any device with an internet connection, meaning no more panicking about forgetting your USB drive or carting around your laptop.
Google Slides also offers an array of interactive and collaborative features that make learning more engaging and enjoyable. You can embed multimedia elements like videos, images, and even interactive quizzes to spice up your presentations. And the best part? You can invite students to collaborate in real-time, fostering teamwork and creativity.
2. Interactive Presentations: Engaging Students with Multimedia Content
Enhancing Presentations with Multimedia Elements
Gone are the days of boring slide decks filled with text and bullet points. With Google Slides, you can bring your presentations to life by adding multimedia elements. Embed videos to demonstrate concepts, insert images to evoke emotions, and include audio to keep your students on their toes. Just remember, a cat video every now and then won’t hurt.
Using Animations and Transitions Effectively
Animations and transitions are like the sparkly sprinkles on top of a cupcake. They add that extra wow factor to your presentations and keep your students engaged. So go ahead, play around with slide transitions to create seamless flows between your content, and use animations to reveal information bit by bit. Just be careful not to go overboard and turn your presentation into a disco party.
-

-
-
-
-
Digital Animation eBook$3.00
-


3. Collaborative Projects: Fostering Teamwork and Creativity in the Classroom
Creating Group Projects with Google Slides
Remember the days when group projects meant endless email threads and mismatched PowerPoint slides? Well, Google Slides is here to save the day. With its seamless collaboration features, you can assign group projects to your students and watch as they work together in perfect harmony. Each student can contribute their slide or even work simultaneously on different parts of the presentation. It’s teamwork made easy!
Encouraging Collaboration and Communication
Google Slides not only allows students to work together but also promotes collaboration and communication skills. Students can leave comments on each other’s slides, provide feedback, and collaborate in real-time. It’s like having a virtual classroom where everyone can share ideas and learn from one another. Who knew presentations could be this exciting?
4. Interactive Quizzes and Assessments: Gauging Student Understanding in Real-Time
Building Interactive Quizzes in Google Slides
Assessments don’t have to be soul-sucking experiences for both teachers and students. With Google Slides, you can use Forms to create interactive quizzes that make learning fun and engaging. Use the built-in features like multiple-choice questions, drag-and-drop activities, and even interactive games to assess your students’ understanding. And hey, if they’re having too much fun, it’s just an added bonus!
Using Add-ons for Real-Time Feedback and Grading
Say goodbye to the days of manually grading stacks of paper. Google Slides offers various add-ons that can make your life as a teacher a whole lot easier. Add-ons like Flubaroo and Form Publisher can provide real-time feedback and even automate the grading process. You’ll have more time to relax with a cup of coffee and less time drowning in a sea of ungraded papers. Cheers to that!
5. Virtual field trips: Expanding learning opportunities beyond the classroom
Creating virtual tours with Google Slides
Ever dream of taking your students on a field trip to the Great Wall of China or the depths of the Amazon rainforest? With Google Slides, you can bring the world to your classroom! Create interactive virtual tours by embedding images, videos, and text into your slides. Take your students on a journey through different locations and cultures without ever leaving the comfort of your classroom.
6. Digital portfolios: Showcasing student work and progress
Building student portfolios with Google Slides
Gone are the days of bulky paper portfolios. With Google Slides, you can create dynamic and visually appealing digital portfolios to showcase your students’ work and track their progress. From artwork to written assignments, your students can easily compile their best work in one place. Plus, they can collaborate with you and their peers, receiving feedback and making revisions in real-time.
7. Differentiated instruction: Tailoring lessons to individual student needs
Personalizing learning with Google Slides
No two students are the same, which is why differentiated instruction is crucial in the classroom. Google Slides offers a range of features that allow you to adapt content to meet the diverse needs of your students. From providing audio recordings for auditory learners to incorporating interactive quizzes for visual learners, you can tailor your lessons to engage and support every student.
8. Tips and tricks for optimizing the use of Google Slides in the classroom
Mastering shortcuts and time-saving techniques
Using Google Slides efficiently can save you precious time and make your lessons more seamless. Learn handy keyboard shortcuts, such as pressing Ctrl + D to duplicate a slide, or Ctrl + K to insert a hyperlink. Explore other time-saving techniques, like creating templates for commonly used slides or utilizing the Explore feature to find relevant images and information for your presentations.
Integrating Google Slides with other educational tools
Google Slides can play nicely with other educational tools you use in your classroom. Integrate your slides with Google Classroom, allowing for easy assignment distribution and submission. Use third-party add-ons like Pear Deck or Nearpod to make your presentations interactive and engaging. The possibilities are endless when you combine the power of Google Slides with other educational tools. In conclusion, Google Slides is a game-changer for teachers looking to incorporate creativity, collaboration, and engagement into their classrooms.
Bonus advanced Google Slides tips for teachers that may not be commonly known:
- Speaker Notes for Private Notes: You can use the speaker notes section to add private notes or reminders for yourself during a presentation. These notes won’t be visible to the audience but can be a helpful reference for the presenter.
- Link to Specific Slides: You can create links that jump directly to specific slides within your presentation. To do this, select the text or object you want to use as a link, click “Insert” > “Link,” and choose “Slides in this presentation.” Then, select the slide you want to link to.
- Master Slides: Utilize master slides to create consistent formatting throughout your presentation. This is especially useful for maintaining a uniform look and feel, such as using the same header and footer on each slide.
- Image Masking: Google Slides allows you to crop images into various shapes. To do this, select the image, click “Format” > “Mask,” and choose from a variety of shapes or even custom shapes.
- Word Art and Drawing: You can create custom text designs and drawings using the Word Art and Drawing features in Google Slides. Access these features through the “Insert” menu.
- Transitions Between Slides: Add subtle slide transitions to make your presentation more visually appealing. Click “Slide” > “Transition” to choose from various transition effects.
- Animations: Animate objects on your slides to add visual interest and emphasize key points. Use the “Slide” > “Transition” menu to apply animations to objects, text, or images.
- Auto-Advance for Timed Presentations: If you’re recording a timed presentation or want slides to advance automatically during a live presentation, set slide timings. Click “Slide” > “Transition” > “Automatically After” and specify the duration for each slide.
- Collaborative Q&A Slides: Create interactive Q&A slides where students can submit questions during a presentation. Use the “Slide” > “Q&A” option to enable this feature.
- Embed Video Playlists: Embed YouTube video playlists directly into your slides to curate a collection of educational videos. Use the “Insert” > “Video” option and select “By URL” to paste the playlist URL.
- Voice Typing: Google Slides has a built-in voice typing feature. Click “Tools” > “Voice type speaker notes” to transcribe your spoken words into speaker notes.
- Version History: To track changes and revert to previous versions, click “File” > “Version history” > “See version history.” This can be especially useful for collaborative projects.
- Publish to the Web: You can publish your presentation to the web, making it accessible to a broader audience. Click “File” > “Publish to the web” to share a link or embed it on a website.
- Export as PDF with Speaker Notes: When exporting your presentation as a PDF, choose the option to include speaker notes. This can be handy for sharing a presentation with others while retaining your notes.
These advanced tips can help teachers make the most of Google Slides for creating engaging and interactive presentations and lessons.
The versatility and accessibility of this tool allow educators to go beyond traditional methods and explore innovative ways to deliver content, assess learning, and showcase student work. By embracing the various features and techniques discussed in this article, teachers can unlock the full potential of Google Slides and create a dynamic learning environment that inspires and empowers their students. So, go ahead and start exploring the endless possibilities that Google Slides has to offer – your students will thank you for it!
FAQ
1. Can Google Slides be accessed on different devices?
Yes, Google Slides is a cloud-based tool that can be accessed on various devices such as computers, laptops, tablets, and even smartphones. As long as you have an internet connection, you can log in to your Google account and access your presentations from anywhere.
2. Can I collaborate with other teachers or students using Google Slides?
Absolutely! Collaboration is one of the key features of Google Slides. You can easily share your presentations with other teachers or students, allowing them to view, edit, and contribute to the content in real-time. This enables seamless teamwork and encourages active participation.
3. Can Google Slides be used offline?
While Google Slides is primarily an online tool, you can enable offline access through the Google Slides app. By downloading and installing the app on your device, you can work on your presentations even without an internet connection. Any changes made offline will automatically sync when you regain internet connectivity.
4. Are there any limitations to the number of slides or file size that can be used in Google Slides?
Google Slides offers ample storage space and supports a large number of slides in a single presentation. While there may be practical limitations based on the performance of your device, Google Slides provides a robust platform for creating extensive presentations without worrying about file size or slide count restrictions.
So, there you have it, creative ways for teachers to make the most of Google Slides. Whether you’re spicing up your presentations with multimedia elements, fostering teamwork with collaborative projects, or making assessments interactive and fun, Google Slides is your trusty sidekick. So go forth, dear teacher, and unleash your creativity in the classroom!


