20 Tips for Teaching Students to Organize their Google Drive
Google Drive is a wonderful tool for storage, sharing and collaboration. However, it also bears an astonishing resemblance to my kitchen counter… always filling up with clutter, and difficult to locate important documents on. If it’s challenging for teachers with years of experience to keep things organized, imagine how hard it must be for our students to stay on top of things! Luckily, your students have you to help them organize their Google Drive.
Step One:
Remember, your own organization skills don’t have to be perfect to help teach others best practices. You are a teacher. You can teach anything, even digital organization skills!
Step Two:
Prioritize the methods that you think will work best for your kids, then take it one lesson at a time. Try equipping your students with these strategies:
- Applied digital skills with Google has a lesson on how to use Google drive to organize files and folders. I just recommend having them delete all the “fake files” that get created during the lessons.
- Have students make folders and see how their stuff fits. This is where they discover for themselves that 1,452 untitled docs is a problem!
- Model how to do everything with your Drive or using a shared student’s projected up on the board.
- Always have students rename and organize a file before they start to work on them. Try to get them in that habit. Each semester make your first lesson a Google drive clean up session. Trying to teach them young and get into good habits! If they’re old enough to create a file to share with you, they’re old enough to learn how to name it properly.
- 1st quarter, every new lesson/assignment say where you want your students to put a file in Drive. Then go around and check too! Q2, remind students but only check periodically, and drift away from delivering specific directions. By Q3 most students should have it you only need to check a handful. By Q4 you usually only needed to check on one or two students. Refer back to past quarter’s files so students see how helpful it is to be organized.
- A consistent naming convention will do wonders for helping students to organize their Google Drive. Keep file names short but precise. For example, you can eliminate words like “and” to keep it short and simple.
- Google Drive allows you to check the last time you opened or edited a file, so adding a date to the file name may be unnecessary. However, students might want to add it as a note to themselves of the due date! If they do add a date, it’s best to include month, day, and year.
- If your students decide to use abbreviations, use uppercase letters to help delineate which part of the file name is an abbreviation. Google defaults to display files in alpha order, so this strategy can definitely help students see things more clearly.
- Students can view the details and activity related to a file or folder by selecting it, then clicking on the “View Details” icon near the top-right. This space lets them to keep the file name simple but add any additional information, detailed descriptions, a note to themselves, and makes their file more searchable.
- Consider color coding, using emojis, and putting a number as part of the name. This helps students organize their Google Drive with the files they want to always stay at the top of their list. There are lots of ways to find and copy emojis into your file and folder titles. Try Emojipedia or copypastecharacter.com to search and copy emojis quickly on the desktop. There are also many Chrome extensions and other places you can find emojis. A member of our Facebook Community shared a screenshot of how those additions can look:
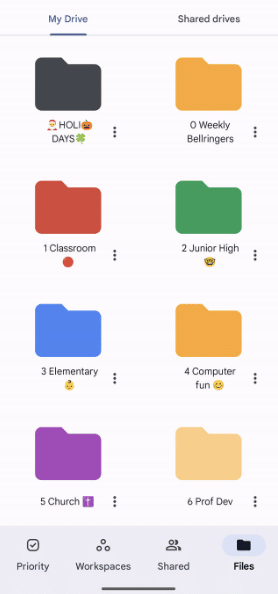
- Color code each Google Drive folder according to what is used in their classroom so that their physical folders are same color (i.e. Reading Red, Math Orange).
- Use a metaphor or an object lesson to help your students understand organizational concepts. Here are a few of the best we’ve heard:
- Use the example of hide and go seek. If I just said I was somewhere on earth how long would it take to find me? What about if I said I was somewhere in this state? Then city, school, classroom.
- Explain the function of Drive like a dresser. You have a drawer for socks, for pajamas, for shorts, etc. If I asked you to find your favorite pair of socks, you would know exactly where to look. Now if I took all your clothes and dumped them in a pile in the middle of your bedroom, could you find your favorite pair of socks just as quickly? That’s what Drive does – it helps you organize things into groups that make sense so it’s easier to find things, especially if you don’t remember what you named the file.
- To stress file naming, ask the kids what would happen if you got lazy and decided to call them all by the same name. Would we be able to tell who I was calling on? Whose work was whose?
- Bring out old school Manila folders to show them physically what a folder in a folder looks like. A language arts folder can have an Esperanza Rising folder inside it to put all of your work with that book. The students’ next task is to make 1 subfolder for each of their courses.
- Give them pictures of animals to organize into groups. We find there are many ways to organize them: farm vs wild animals, eat or don’t eat, # of legs etc. Then talk about the kinds of categories they could have in their Drive. Students can make a tree on paper and rearrange its leaves to decide what kind of folders they need.
- Recommend students create folders for each grade, then subfolders by subject as well in higher grades. Click on the drop-down arrow next to “My Drive” to open your current list of folders so you can easily click-and-drag files into folders.
- Try the “21 Detox” to organize your Google Drive. We’re all busy, with seemingly endless demands on our time. This type of detox program was created with those demands in mind, to be easily incorporated into your daily routine. As soon as students get to class by set a timer and have them devote just 5 to 10 minutes a day towards tidying up their files. They can go in and organize or delete a little each time. It won’t hurt, and little by little it will help. Have your students start by deleting those…copy of…copy of…that they probably have literally hundreds of!
- Have students put their files in list form while organizing. Then they can look at the date and decide if they still need it, or which folder to put it in.
- At the end of each school year have a lesson where students spend time naming each file and moving it into their grade level folder. If it is blank or junk, they can delete it. This is also a good time to “archive” folders to store things they no longer need.
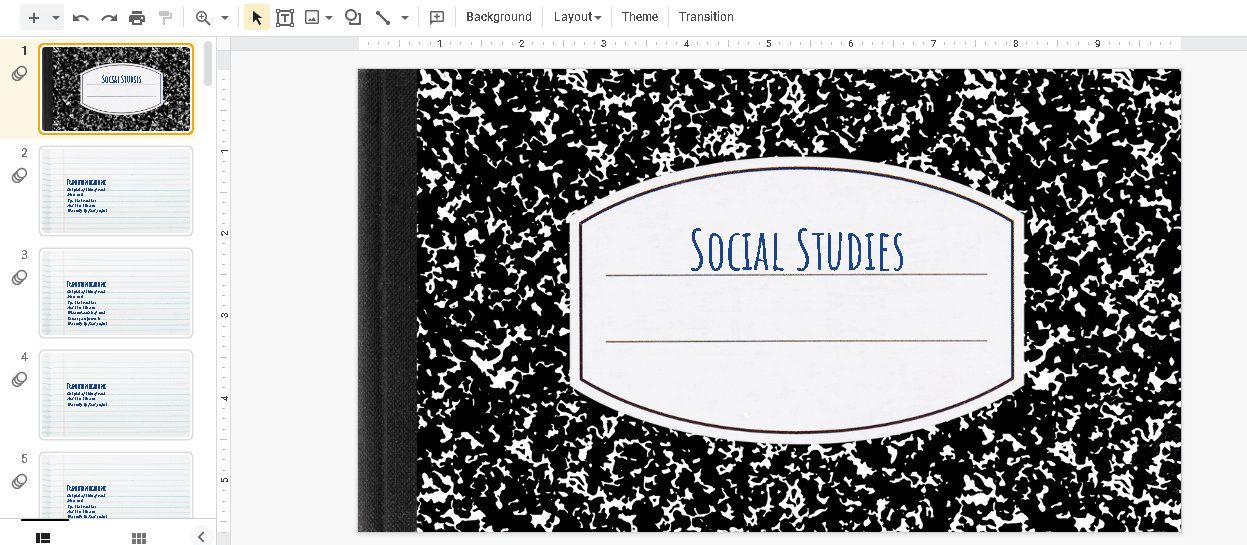
- Create a slide deck to act like a subject folder, with each slide serving as a subfolder. Give the first slide a composition book image, or use a template. Students will label each slide a different quarter, type of writing, etc. Then list the title of the piece and link to it.

- Show them the search bar… and teach them how to use the advanced search features as well! Of course, this only works if you can get them to name their files. Teach them that naming things properly is critical so the files can be easily searched.
- Teach students how to add files to multiple folders (without making copies). This allows folders to act more like tags or categories. It also gets students to organize their Google Drive without agonizing too much over what category to place things in! To add a file to multiple folders from Google Drive:
- Single-click the file in Google Drive
- Use the keyboard shortcut, “Shift + Z.”
- A pop-up will open and allow you to add a shortcut for that file to an additional folder.
- Add the files from the “Shared with Me” section of Google Drive by right-clicking on the file and choosing “Add to Drive.” Another way to do it is select the file and click on the “Add to Drive” icon from the menu.
We hope these tips help get you and your students more organized this school year!