Google Drawing

Google drawing is a free software by Google. It allows users to easily create diagrams and charts. Users can collaborate with each other in real time by using Google Drawing. This tool is very useful for creating flowcharts, concept maps, layout diagrams, mind maps and many other types of charts. There is a wide variety of shapes available that you can use to create diagrams and charts.
Google drawing has made group tasks easier because multiple people can also work on a single diagram at a time. Anyone who has a Google account can use this tool without any cost. This tool is widely used in organizations and in classrooms.

Here is how you can create a drawing by using google drawing:
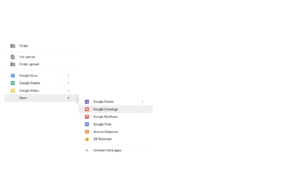
- Go to Google drive on your computer.
- On the top left corner, you will find a “new” button. Click on New > More > Google Drawings

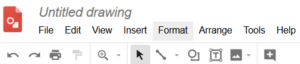
3. By using editing tools, insert shapes, drawings of your choice.
4. Once you are done, copy and paste your drawings to another file.
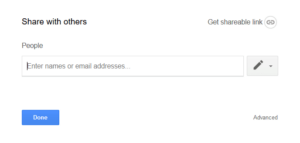
Here is how you can share google drawing with other team members:
- On the upper right corner, click on the “share” button.
- Enter the details of your team members to whom you want to give access.

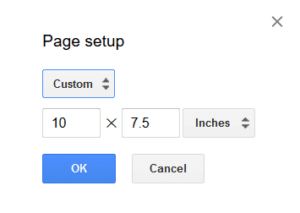
If you want to resize the canvas (in case you don’t want it to be on a whole page), use the following method:
- Go to “File”.
- Click on “page setup”.
- Click on “custom”.
- Choose the default measurement of your choice (inches, centimeters, points or pixels).
- Choose the size that you want.
Here is how you can add text to the shapes:
- Double click on a shape.
- You will see a text icon (T in a rectangle). Click on this text icon.
- Drag the text box as per your requirements.
- Type the text in text box.
You can also align, highlight and format the text as per your requirements.

Google Drawing is considered as one of the best tools that can be used for teaching and learning. If you want to use Google Drawing with your elementary students, here is the best way by which you can do it:
Create a Foldable Book
Creating a foldable book with Google drawing is a fun and interesting project that your students will definitely enjoy. Here is how you can do this:
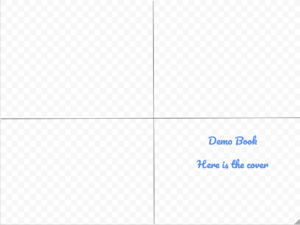
- Divide the page into 4 equal boxes or parts by using lines in (+) shape.
- In the bottom right box, place the cover image of your book.
- In the bottom left box, place the picture of the back cover.
- In the top left and top right box, place images and texts. But keep this in mind that everything that you place in these two boxes should be upside down.
- Print this drawing.
- Fold the drawing from left to right and then from bottom to top in order to make a book.
This is the best way by which students can create books about something that they are already learning. It will enhance their learning skills and will develop interest. By using the same way, students can also make greeting cards.
Click here for a presentation you can use with your staff. It is completely editable so feel free to make any changes you need.